
Whilst the process of deployment hasn’t changed too much since the days of Dynamics CRM, one thing that has changed significantly is the volume of possible components that can be included in a solution file.
Not only is this due to an increase of readily-available functionality from Microsoft, but also by the ability for end users to install their own components, which in turn creates more dependencies on (what we think) is our small solution of configuration changes to be deployed from one environment to another. This can increase the number of failures that can occur during delivery, and often, the end user error isn’t very helpful.

Solution deployment failures don’t have to be a problem, in fact, we should expect them.
In this blog post I will help you understand how to troubleshoot a failed deployment so that you can solve the issue in an informed way.
Step 1: Download A Code Editor
We want to ensure that the output from the failure is in a readable format, and for this we need a code editor that recognises XML formatted files. My preference as a functional consultant who needs to open the occasional file is Notepad++. It’s free, and it has an XML Tools plugin which allows you to ‘pretty format’ any XML files. You can also use Visual Studio or Visual Studio Code – I suspect some of you reading this will already have one of these installed!
Step 2: Download The Solution’s Log File
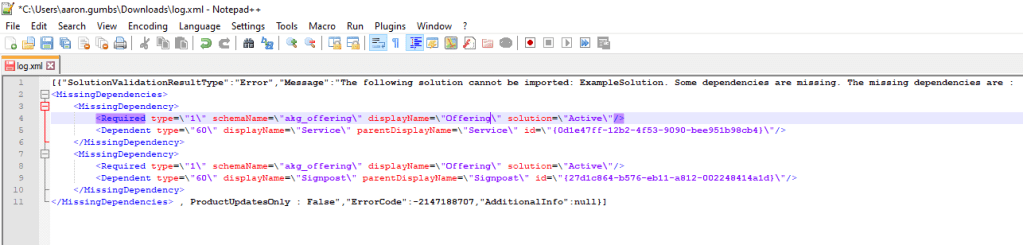
Whenever someone approaches me with a failed deployment, the first thing I ask them for is the log file. When you open this file in Notepad++, use ctrl+alt+shift+B, which will ‘pretty format’ your XML file. It’ll look something like this:
It looks difficult to decipher to the untrained eye, but we can quickly start to understand why the solution is failing with a few tips when we break down the file.
Step 3: Understand The Dependency
Let’s take a look at the first dependency, defined by the <MissingDependency> XML tags.

You’ll notice a <Required> line and a <Dependent> line which both include a Type. This, alongside the schema name, is the most important part of the dependency, as the two combined tell us what we’re looking for.
Fortunately we don’t need to remember all of the types as Microsoft provide a handy reference guide here.
We simply need to cross-reference the numbers in our dependency, and we now know that to complete the deployment we need to include the “Offering” entity (table) for the “Service” System Form.
Step 4: Modify Your Solution
We have two choices here:
- Remove the Service System Form from the solution, or,
- Add the Offering entity (table) into the solution.
In this particular instance it would make more sense to add the Offering into the solution, but sometimes you may challenge whether the component is really needed within your deployable solution, in which case, you’d remove the System Form.
Step 5: Rinse & Repeat
Not all dependencies will be resolved within one solution modification, but that’s ok, and you may need to repeat steps 3 & 4 multiple times before you have a solution file that can be successfully deployed. The key is to remember that failures can be expected, and that they don’t always have to be a problem!
