When you use a dropdown control within a Canvas App it can be surprisingly tricky to show exactly what you want as an option unless the data already exists as a value in your data source. I assume that the reason for this is that dropdown controls are most commonly used within forms, and therefore the options available need to be valid for your submission otherwise your data entry will fail.
Dropdown controls have other uses too such as filtering data within a Table or a Gallery, and in this situation, you may need the data displayed under your control based on processing within the Canvas App itself. Last week I needed to do exactly that!
The Challenge
I am currently building a small timesheet approvals app, and the dropdown I wanted to create needed to display a list of people with an indication to the end user of how many unapproved time entries there were for that person. Afterall, if 40% of people had no unapproved time, it would be really frustrating for the end user to endlessly click on people to find that they have no time entries awaiting approval. In my example, I was using data from a Collection that was getting data from a table in another data source holding delivery resources, and I could choose any of the following fields but I couldn’t do anything else as the Value Property is not available for me to modify with Power Fx.

This may not be a problem in other use cases as the people with approved time could be disregarded from the Collection by filtering on Delivery Resources where ‘unapprovedcount’ is 1 or more, but this won’t work for me with the app’s requirements so I had to seek another solution so that I could show ‘name’ and ‘unapprovedcount’ as one dropdown item.
The Solution
The workaround for this was relatively simple, but trying to find resources on how to achieve it was proving tricky! Given that we have already created a Collection from the data source called ColDeliveryResources, we simply need to create a second Collection based on this to add a column to the existing data, and in this particular case I needed to also sort by the number of unapproved timesheet entries too. By doing this in the OnStart property of the app, we can use Power Fx here to define a new column that we can select within the Value property of the Dropdown control:
First Collection
//Collects all resources from the Delivery Resources table to use across the app.

ClearCollect(ColDeliveryResources, ShowColumns('Delivery Resources',"name","resourceid", "email", "unapprovedcount"));
Second Collection
//Collects the results from ColDeliveryResources and adds a column to each one combining 'name' and 'unapprovedcount'. For example, 'Aaron Gumbs (9)'. Once this has been achieved, we sort the names from highest number of time entries unapproved to lowest so that the end user can prioritise their workload.

ClearCollect(DropdownDisplay, SortByColumns(AddColumns(ColDeliveryResources, "displayname", Concatenate(name," (", unapprovedcount,")")),"unapprovedcount",Descending));
Final Result
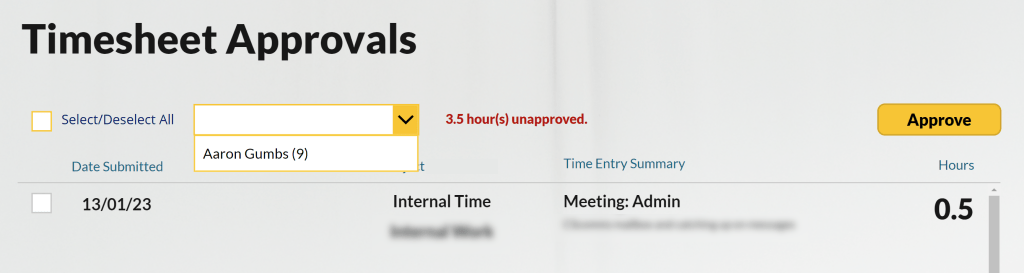
Once I had run OnStart and my new collection was available, I simply needed to swap out the original Collection for the new one in the ‘Items’ Property of the Dropdown control, and ‘displayname’ became available to select, allowing me to finally show both ‘name’ and ‘unapprovedcount’ on the screen as shown below.