Does anyone remember Wunderlist or Sunrise? Each one was bought by Microsoft and became what Microsoft To Do and the Outlook app are today, and there’s just one feature that I still miss to this very day! Seeing my To Do items on my calendar by Due Date so that I can prioritise tasks around meetings without having to duplicate administration!
I add, remove, and edit To Do items multiple times per day, and whilst something similar is possible via Power Automate cloud flows, I thought I’d take on the task of developing a small Power App to do this for me as I like to visualise my upcoming day in a certain way.
In the past I have shared how to “Visualise Your Day’s Meetings in Canvas Apps“, but for this post I plan to do the same with Microsoft To Do items with the eventual aim of using both of these posts to replicate the old functionality of Sunrise and Wunderlist that I so badly crave! In part 1 we will build the functionality, and in part 2 we will create some styling to provide expected visual indicators for the end user.
To set expectations, I did not anticipate such complexity to deliver what I’d consider such a simple calendar view, but there is a lot of maths that goes into this which Microsoft go to great lengths to explain the logic behind their Calendar template: Reference information about the calendar-screen template for canvas apps – Power Apps | Microsoft Learn
We won’t be using that template here, but we will be taking learnings from it in order to optimise the speed of this exercise as the template can sometimes be slow to load due to direct querying.
Understanding the Maths
Before we get building, let’s go through several challenges that I faced whilst doing this so that you don’t have to. These wil explain why calculations are not as straight forward as we’d like:
- DueDateTime comes from Microsoft To Do in Table format along with its TimeZone pairing and it isn’t always recognised as a Date. Not only this, but DueDateTime can only be set through user interfaces as ‘date only’, and so using the retrieved value will unintentionally show the due date one day early if you are ahead of UTC. For example, setting the DueDateTime to today (British Summer Time) via the To Do app looks like 13/06/23 to us, but in the back-end it stores as 12/06/23 23:00:00. There are good reasons for this when you consider push notifications, etc., but it means that we have to take an extra step in our configuration.
- As the day and date pairing are not the same for any given week or month, we have to dynamically calculate what the date was on Monday. We do this by introducing positions, and we will use several calculations behind the scenes to work out if any given day and date pairing is last month, this month, or next month.
We’ll use this knowledge in the next step.
Set up our App, Collections, and Variables
For this app I want to primarily see the results on my phone, so you’ll see screenshots using the Portrait Orientation at 16:9 from here. This is entirely preference and isn’t required to complete the exercise.
Before we create our Collections, we’ll need to ensure that we can configure a Connection to Microsoft To Do. This Connection is called Outlook Tasks and uses your Microsoft 365 credentials.

Once this Connection is within our app, we can now go ahead and set up all of the Collections and Variables in the OnStart Property of the App:
- MyToDoItemsRAWCol – Retrieves all of the To Do items
- MyToDoItemsCol – Creates a new Collection containing a formatted LocalDate field based on the difference between UTC and your local date.
- MyToDoFoldersCol – Retrieves all Folders that you have in Microsoft To Do
- CalendarDaysCol – Creates a Collection of 42 items which will become really useful later on
- DaysofWeekCol – Creates a Collection of 7 items to indicate the day of the week
- varFirstofMonth – Identifies the first day of the month by constructing a date based on today’s month and year, and then replacing the day value with 1.
- varLastofMonth – Identifies the last day of the month by adding one month to varFirstofMonth and subtracting one day
- varFirstDayOnCalendar – Identifies the Day that should show on the Calendar by working out the difference between today and the Monday just gone. In this month’s view, the first Monday to be shown should be 29th May 2023.
//Show me all of my incomplete To Do items. Note that this requires a timezone offset following retrieval due to the way dates are stored in Outlook Tasks.
ClearCollect(
    MyToDoItemsRAWCol,
        OutlookTasks.GetAllTasksV2().value
);

ClearCollect(
    MyToDoItemsCol,
        AddColumns(MyToDoItemsRAWCol, "LocalDateTime", DateAdd(DueDateTime.DateTime,-(TimeZoneOffset()),TimeUnit.Minutes))
);

//Retrieve all of my To Do folders.
ClearCollect(
    MyToDoFoldersCol,
    OutlookTasks.GetAllTaskFoldersV2().value
);

//Collect the most possible amount of positions shown on a calendar view at any given time.
ClearCollect(
    CalendarDaysCol,
    0,1,2,3,4,5,6,7,8,9,10,11,12,13,14,15,16,17,18,19, 20,21,22,23,24,25,26,27,28,29,30,31,32,33,34,35,36,37,38,39,40,41
);

//Collect Day of Week Identifiers
ClearCollect(
    DayofWeekCol,
    "M", "T", "W", "T", "F", "S", "S"
    );

//Set variables for first of month, last of month, and 'the date that Monday falls on during the first week on my calendar'.
Set(varFirstofMonth, Date(Year(Today()), Month(Today()),1));
Set(varLastofMonth, DateAdd(DateAdd(varFirstofMonth,1,TimeUnit.Months),-1,TimeUnit.Days));
Set(varFirstDayOnCalendar, DateAdd( varFirstofMonth, -(Weekday(varFirstofMonth) - 2), TimeUnit.Days ) );

Set(varLastMonth, DateAdd(Today(),-1,TimeUnit.Months));
Set(varNextMonth, DateAdd(Today(),1,TimeUnit.Months));
Create the Calendar using a Gallery
In order to show our calendar in a structured format, we can use a Blank Vertical Gallery with a Wrap value of 7 to ensure that we only show seven days on any given row. This will provide us with less work to do initially when we decide what controls to display, as we want small item templates with several labels rather than what’s provided with the normal Vertical Gallery Control.

We’re going to assign the CalendarDaysCol to the Gallery but we’re not going to show the Value in a Label control otherwise you’ll see 0 to 41 in position. Instead, we’re going to calculate the correct Day to be shown by using the following formula within a new Label control.
Day(DateAdd(varFirstDayOnCalendar, ThisItem.Value, TimeUnit.Days))In this context, Item 1 within this Gallery adds zero to 29/06/23, meaning that ’29’ will show in the gallery. This continues for six rows within the Collection.
Each Item has a large Height and the Gallery is scrollable. Adjust the sizing of your Gallery and your Template Size and you should end up with the following:

Although we can see the Day on the Calendar, we don’t actually store anything else contextually yet but we need to understand whether the selected Day is last month, this month, or next month. By adding a hidden Label Control (by setting the Visible Property to false), we can easily store a “variable” to identify the month position. I personally found this very difficult to get my head around, but when applying Microsoft’s Calendar logic to my own app and changing my ‘first day of week’ to Monday, this range sat between -1 and 5. Unfortunately we can’t use < or > in Switch cases yet, so…
- If the returned value is beween -1 and 5, set the Label to ThisMonth
- If the returned value is less than -1, set the Label to Last Month
- If the returned value is more than 5, set the Label to NextMonth
If(ThisItem.Value - Value(LblDay.Text)>=-1 && ThisItem.Value - Value(LblDay.Text)<=5,"ThisMonth", If(ThisItem.Value - Value(LblDay.Text)<-1, "LastMonth", ThisItem.Value - Value(LblDay.Text) >5, "NextMonth"))Construct the Task List
Before we do anything further with the Calendar we just need another Gallery that will allow us to display items from our MyToDoItemsCol Collection in a filtered way. Let’s start by using a Vertical Gallery and choose MyToDoItemsCol as the data source for now temporarily.
You’ll now see a list of all of your items with no filtering.

Note that in the screenshot I have started to rename Controls that I am finished with, this will be extremely useful later on. From here there are a whole range of data points you can display on your Gallery, but for now I’m going to add the Folder name and the Task Subject to the content.
When retrieving To Do items you only receive the Folder Id as opposed to the friendly name that we would prefer, so whilst adding the subject of the Task is relatively easy by using ‘ThisItem.Subject’, we have to perform a Lookup to MyToDoFoldersCol to retrieve this value by using the code below:
LookUp(MyToDoFoldersCol,Id = ThisItem.ParentFolderId).NameFinally, using our Label Control from the Calendar to determine the month position, we can now construct the relevant date to use for comparing against the DueDateTime in the To Do Item Gallery control.
- If the selected date is in LastMonth, construct a new date where the year and month are calculated by subtracting one month from today’s date, but we take the selected item’s Label from the Calendar Gallery.
- If the selected date is in NextMonth, we use the same method as above except that we add rather than subtract.
- If the selected date is in ThisMonth, we require no adding or subtraction from today’s Month or Year value, and we combine these with the selected Day value.
If(LblMonth.Text="LastMonth",Filter(MyToDoItemsCol,Text(LocalDateTime,DateTimeFormat.ShortDate)=Text(Date(Year(varLastMonth),Month(varLastMonth),LblDay.Text),DateTimeFormat.ShortDate)),If(LblMonth.Text="NextMonth",Filter(MyToDoItemsCol,Text(LocalDateTime,DateTimeFormat.ShortDate)=Text(Date(Year(varNextMonth),Month(varNextMonth),LblDay.Text),DateTimeFormat.ShortDate)),Filter(MyToDoItemsCol,Text(LocalDateTime,DateTimeFormat.ShortDate)=Text(Date(Year(Today()),Month(Today()),LblDay.Text),DateTimeFormat.ShortDate))))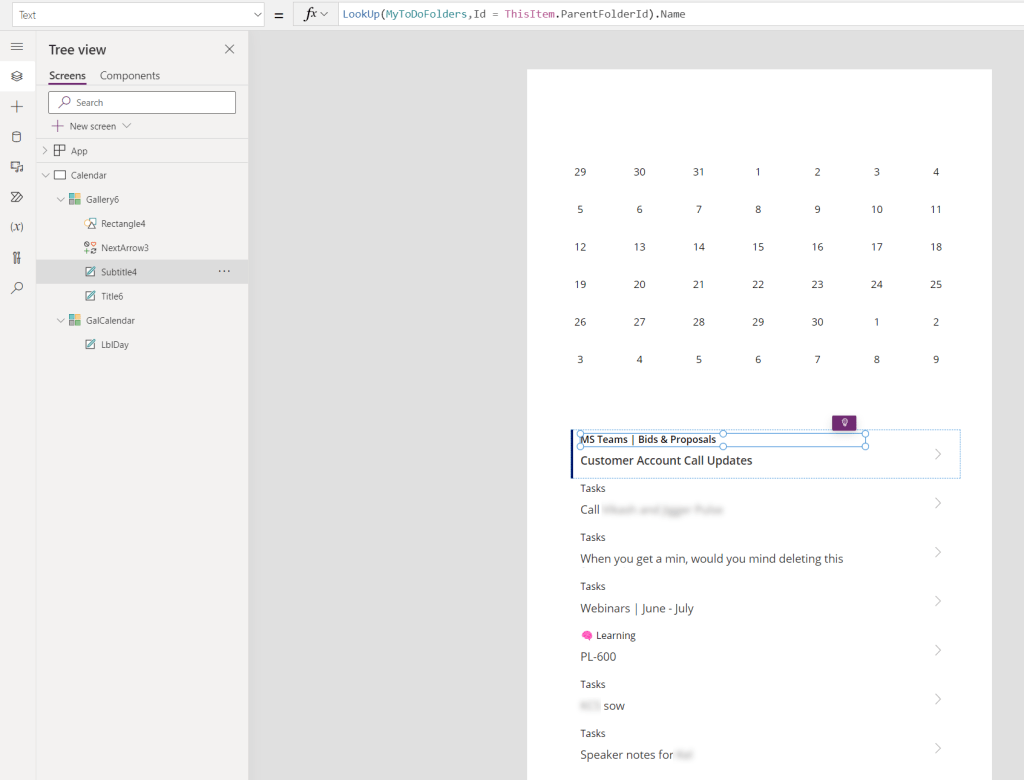
At this point we now have a fully working calendar selector that filters our To Do items, but the user interface feels incomplete and there are so many more visual indicators that we can create for the end user, such as changing the month, indicating dates with items associated with it, and much more.
This element of the build is entirely subjective based on your use case, so I have split the function from the design and will be writing a part 2 soon! Whilst we wait, I’d love to hear what you plan to do with your screen following the function build!
