Do you ever have an idea late at night and have to implement it just in case it falls out of your mind by the time you wake up in the morning? That was me last night.
As the Head of Power Platform, there are various ‘notices’ that my team need to be aware of throughout the calendar and financial year. Often they are simply acknowledgements rather than actions, and whilst Microsoft Outlook goes a long way towards helping us see what’s current, having these amongst our usual daily meeting invites does not help to signify their importance.
Alternatively, I have decided to use a Microsoft List (SharePoint Lists) and Power Automate to bring the information to my target audience in our group chat in Microsoft Teams, and here’s how:
1. Create a Microsoft List and Configure
Head over to https://www.microsoft365.com and choose Lists from the waffle menu. Alternatively, if you’re only using your browser for your work profile then you can also head over to https://lists.microsoft.com to save a few clicks.
Click on ‘+ New list’, and Choose the ‘Blank list’ option. Make the name obvious, and choose a location that is accessible to your team members. As you can see below, I’ve simply called this “Rhythm of Business” and I intend to saved the List in our Power Platform Team.

Your new List needs two fields:
- Title – The default Text field already created for you. You can rename this to Event or anything similar if you wish.
- Month – A new Choice field that contains the numbers 01 – 12, and it should allow multiple values to be selected which can be done by expanding the ‘More options’ dropdown.
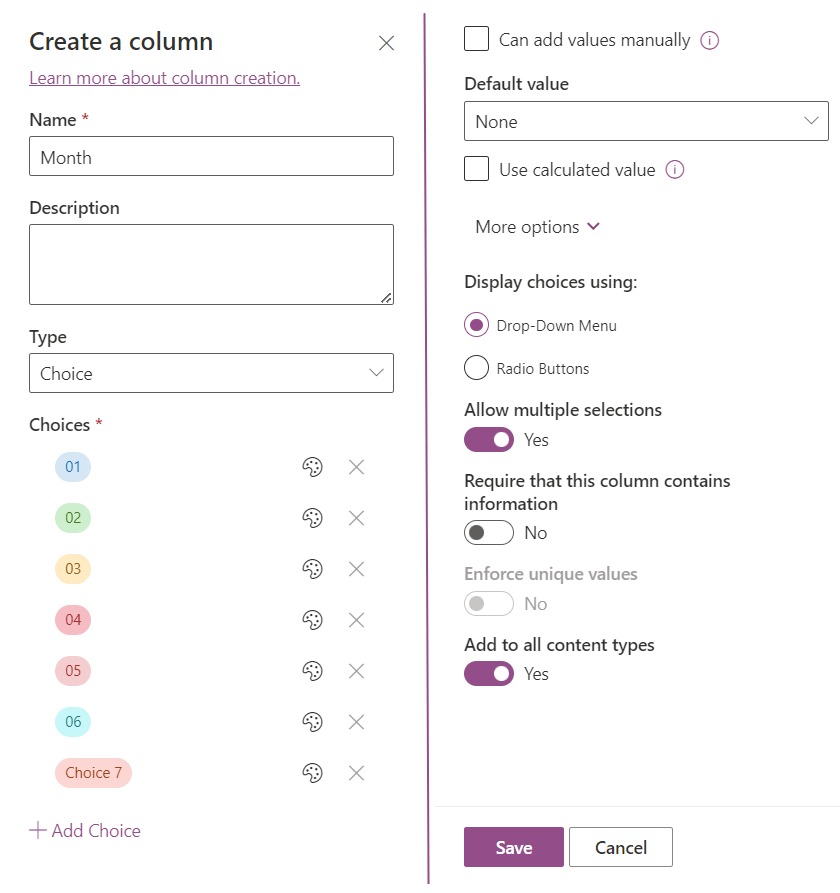
Note: As the dialog becomes scrollable after so many options, I have only added six options to this screenshot, but please ensure that you create all 12 at this stage.
Add some rows of data to your List, and remember to make sure that you include an item for this month.

2. Determine your Power Platform setup
Head over to https://make.powerautomate.com, and take a moment to consider several options:
- Which environment should you be working in? You can change this from the environment selector in the top-right of your screen.
- Will this be deployed or is this considered personal productivity? You might want to use a solution to contain your flow at this stage.
I consider this cloud flow a part of my management duties that won’t impact anyone else’s configuration, and as a result I have decided to create this in my personal productivity environment outside of any solution files. Please refer to Microsoft Learn documentation if you need further help on creating solutions at this stage.
3. Configure your Cloud Flow
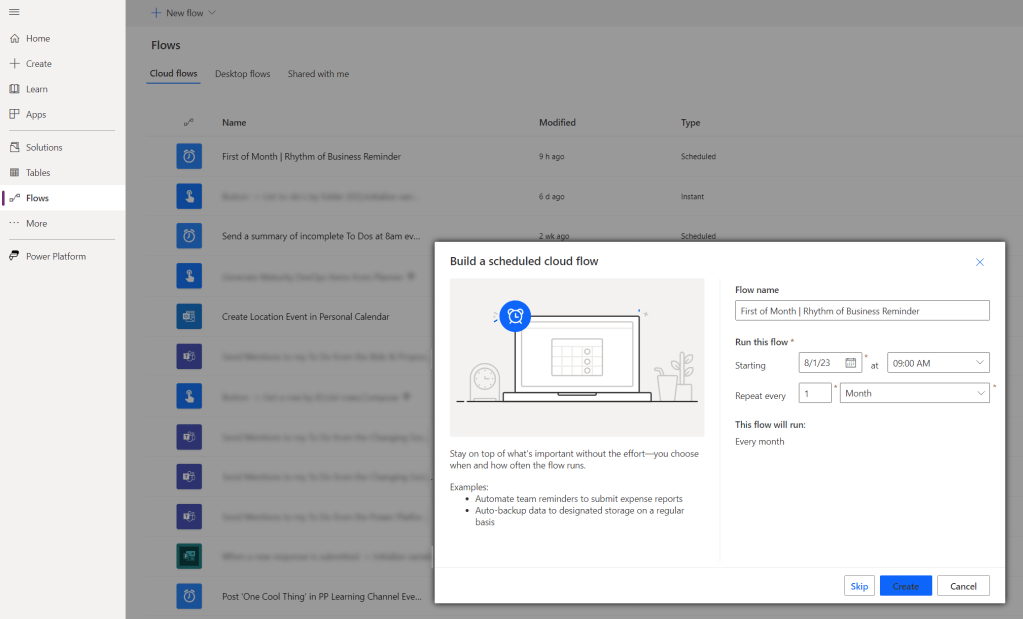
Whilst you’re still at https://make.powerautomate.com, if you’re making the same decisions as me then head over to ‘Flows’ from the navigation on the left-side of your main screen, choose ‘New Flow’ and click on ‘Scheduled cloud flow’.
For those using solutions, at this stage you’d want to create a new Automation within your Solution window, and you’ll see the same ‘Scheduled cloud flow’ option available.
To process the data in the correct way, we need to do the following actions:
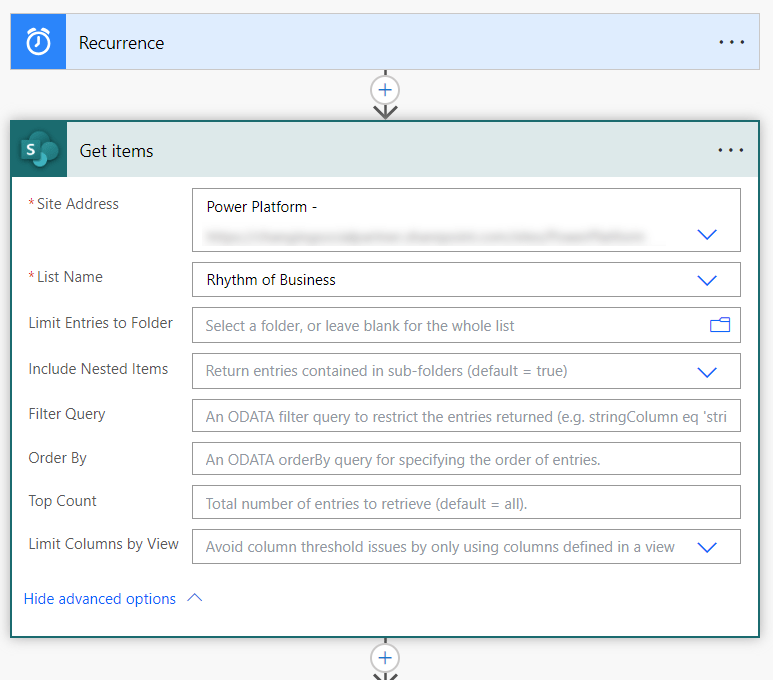
Get items from the List
Remember, Microsoft Lists is technically a fancy front-end to SharePoint Lists, and therefore we need to use the SharePoint Connector to retrieve our data. Click on the + underneath your Recurrence Trigger and choose ‘Add an action’. By searching for ‘get items’ you’ll see the SharePoint action that we need come up as the first resul

At this point you may want to take a shortcut by using the Filter Query to limit the data that is coming into your cloud flow, however, I intend to extend this in the future by showing a message more likened to a rolling calendar and I want as little rework as possible.
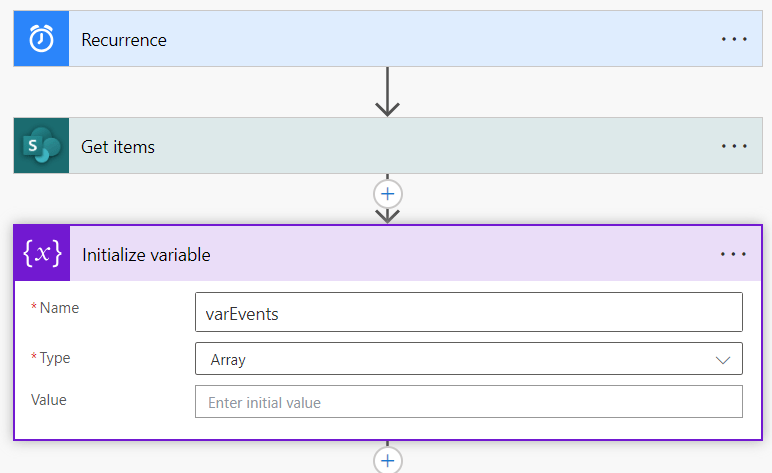
2. Initialize an Array variable
As we plan to only use a subset of our data we need somewhere to store it! Personally, I prefer to use Arrays to do this as I have full control over the construct of it and it becomes extremely easy to format correctly for a Microsoft Teams message.
This step is simple. Once again add an action to your cloud flow, and search for ‘Initialize variable’.
Be sure to choose Array as the Type, otherwise you won’t see this variable available later on.
3. Apply to each x2
This step can be confusing and doesn’t come naturally if you’re not used to programmatically configuring solutions. We need to tell the cloud flow ‘for each item, check whether any of the months selected equal to the current month, and if it does, add this item to the Array’.
In some circumstances I’d recommend just selecting your Dynamic Content and letting the cloud flow determine where to add your ‘apply to each’ actions, but as we need to loop through the items and then through the month options, it’s better to take a hybrid approach.
First of all, add a new action and search for ‘Apply to each’. Choose the ‘value’ item from the ‘Dynamic content’ tab on the right-side of your action, and then add a ‘Condition’ inside your existing ‘Apply to each’ action.
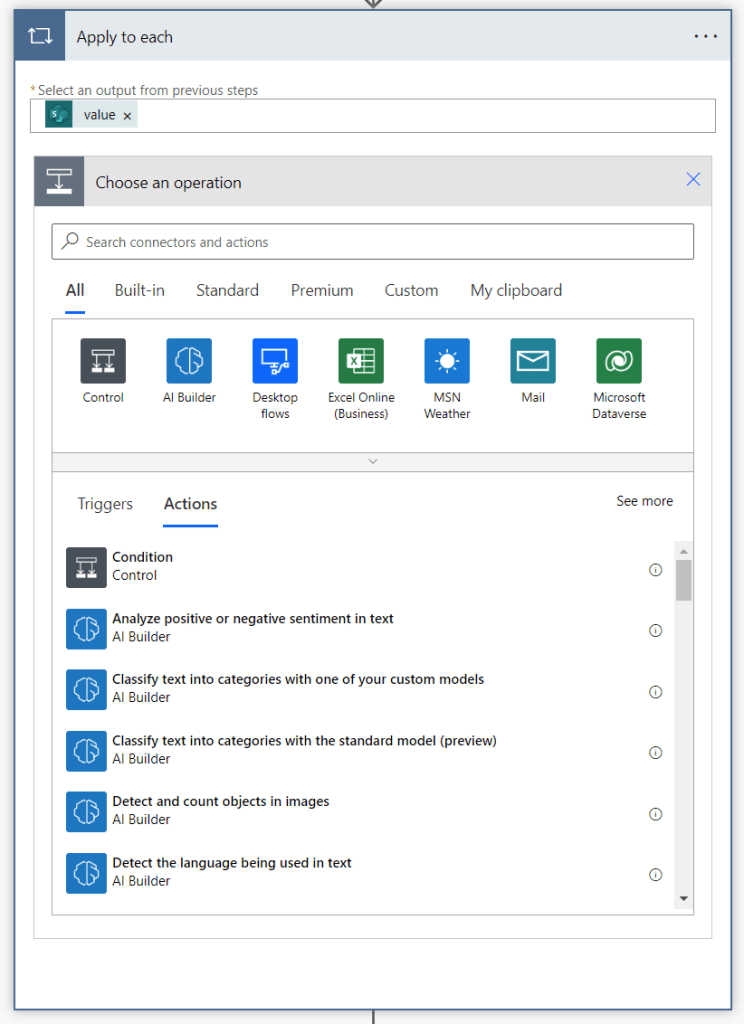
Within the ‘Choose a value’ text box you’ll notice that you can search for Month, Month Item, and Month Value. This is because the cloud flow now has context of the item itself, and not just a set of items. Select ‘Month Value’.
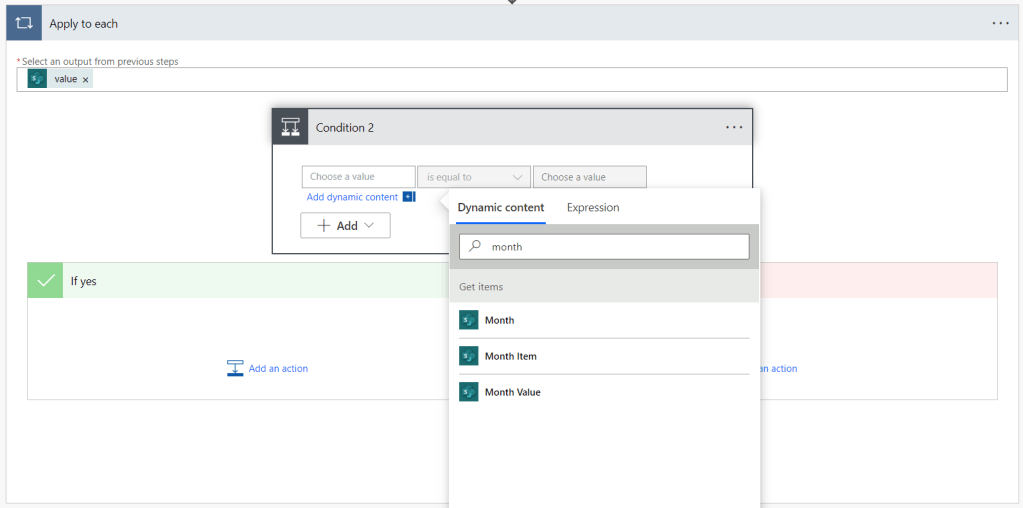
At this stage we want to compare the item’s Month Value to the current month’s Month value. For example, we would want to compare it to ’07’ if the date was 18/07/23. We can do this by using the following expression:
formatDateTime(utcNow(), 'MM')Remember to type this code into the ‘Expression’ tab rather than directly into the text box. This will produce a new tag with an fx indicator next to it to show that it recognises the formula. It’s also a good idea to rename your actions at this stage, as it’ll make your errors more meaningful if something doesn’t work.

Append to the varEvents Array
If we satisfy the conditions (the item selected does indeed contain this month in the Choice column), then we need to add the item to the Array so that it can be shown in the Microsoft Team’s message. We can construct part of this code using free text, but we must use the Title from our ‘Dynamic content’ window to make sure that you show the right information.
The code below will do this for you automatically:
{
  "Event": @{items('For_each_item')?['Title']}
}
Replace ‘For_each_item’ with the name of your first ‘Apply to Each’ action, and replace ‘Title’ with the name of your free text column in your SharePoint List. Remember that both of these require single quotation marks.

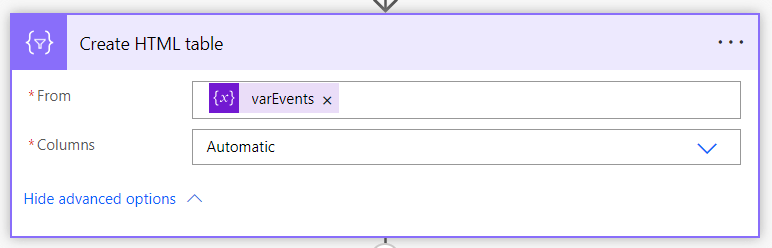
Create HTML table
You have now completed the hardest part of the solution, and for this step we simply need to add an action to create a HTML table from the varEvents Array, and due to the way that we have constructed the Array, we can allow automatic creation of the Table columns by Power Automate. You can confirm this option by clicking on ‘Show advanced options’.
Post message in a chat or channel
Finally, you simply need to construct the message that you want to send to your audience, and when you do so, be sure to include the Output from your new HTML table.
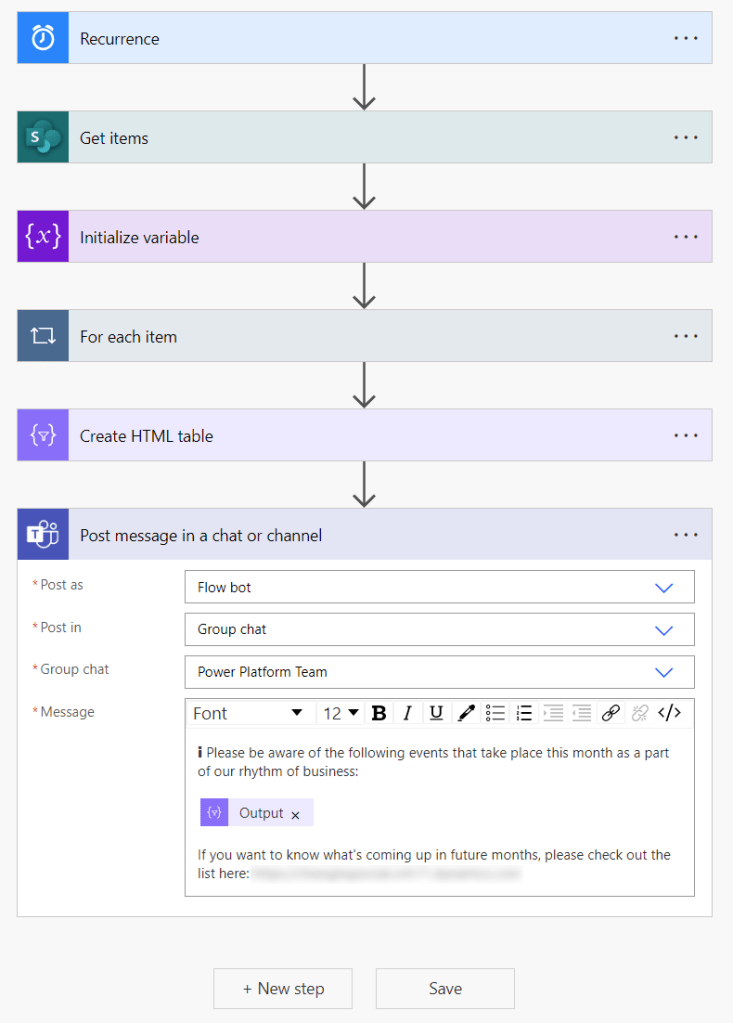
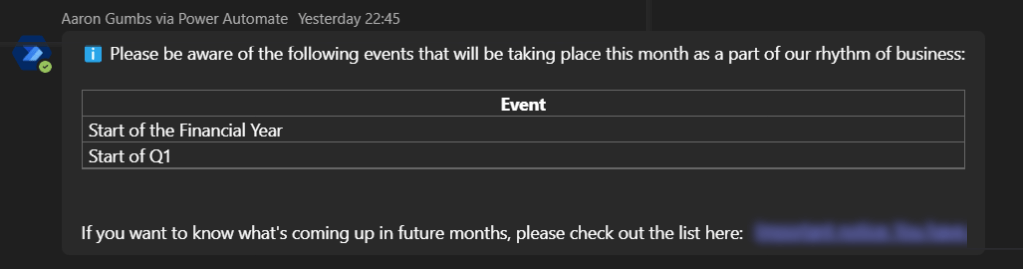
The ℹ️ emoji doesn’t look great here, but I can assure you that it looks much better in Microsoft Teams!
4. Test!
The last step within your solution is to test your cloud flow. As this flow runs on recurrence, you can automatically trigger the test from the Power Automate configuration screen, and you should see something like the message below assuming that you have added items to your List for this month.
Tip: If you don’t want to actually send a message whilst testing, add a temporary ‘Terminate’ action before the last action. This will allow you to confirm that data is flowing (no pun intended!) through your automation in the way that you expect.
